Tape out an analog tile on Tiny Tapeout
In this tutorial you take a finished cell, the CMOS inverter inv, and turn it into a
Tiny Tapeout SKY130 analog tile. You check the tile the way Tiny Tapeout's precheck does,
run the full DRC and LVS sign-off suite, and export the bundle of files that goes into your Tiny Tapeout repository.
When you finish, you have:
- a top cell
tt_um_undine_invthat fills a 1x2 tile (161 × 225.76 µm), with the inverter wired from the analog pinua[0]toua[1]; - a clean sign-off: KLayout DRC, Magic DRC, KLayout LVS and Magic + Netgen LVS, all on the design as it is now;
- a zip with
gds/,lef/,src/project.v,info.yaml,docs/info.mdand areport.jsonthat records what was checked.
The tile is built by a script, so this tutorial is about the tapeout steps, not about drawing. The last sections show what to do with the bundle on the Tiny Tapeout side.
Before you start
You need:
- Undine installed, with the sky130A PDK and the verification tools (KLayout, Magic, Netgen). See
Install;
./setup.sh check(orpixi run doctor) tells you what is missing. - A project on sky130A. This tutorial uses the project
demoand the librarymylibfrom First project.
You do not need the inverter yet: step 1 builds it. If you made inv yourself in
Your first cell: an inverter, read the warning in step 1 first.
The Undine server must be running for every step:
pixi run serve # http://127.0.0.1:8700
Open http://127.0.0.1:8700 in your browser and choose demo in the project menu at the top left.
Run the example scripts next to the server
The scripts in examples/ write some files straight into the project directory ($UNDINE_ROOT, default
~/undine-projects), so run them on the machine where the server runs, with the same UNDINE_ROOT.
make_inverter.py only writes files. route_inverter.py and make_tt_inverter.py also call the server's HTTP
API: if the server is not on http://127.0.0.1:8700, pass its URL as their third argument.
1. Build the inverter
pixi run python examples/make_inverter.py demo mylib     # schematic inv and testbench tb_inv
pixi run python examples/route_inverter.py demo mylib    # layout of inv, routed, then LVS
route_inverter.py ends with the LVS result. You should see "match": true and the four pins A, Y, VDD and
VSS matched:
pins [('A', 'A', 'Match'), ('VDD', 'VDD', 'Match'), ('VSS', 'VSS', 'Match'), ('Y', 'Y', 'Match')]
Run both scripts, even if you already have an inv
The tile script in step 2 places its via stacks at fixed offsets from the inverter's origin. They land only on the
exact layout that route_inverter.py draws, and route_inverter.py expects the schematic that make_inverter.py
writes (M1, a 2 µm pfet, above M2, a 1 µm nfet). On an inv you routed by hand, the tile's A, Y, VDD
and VSS connections miss, and LVS of the tile fails.
Both scripts replace an existing inv: make_inverter.py overwrites its schematic and route_inverter.py
deletes everything in its layout. To keep your own inverter, pass another library name instead of mylib, for
example ttlib, and use that name in every command and URL below.
If LVS does not match
If LVS reports a mismatch or a tool is missing, see Troubleshooting, in particular
pmap is missing, or sky130 LVS fails at once.
2. Build the tile
pixi run python examples/make_tt_inverter.py demo mylib
The script prints nothing when it succeeds. Reload the page in your browser: the library mylib now has a cell
tt_um_undine_inv with a schematic (sch) and a layout (lay).
The script makes the two views that every Tiny Tapeout analog tile needs:
- The wrapper schematic. It places
invand connects it to the tile's pins:ua[0]toA,Ytoua[1],VDPWRtoVDDandVGNDtoVSS. LVS compares the tile's layout with this schematic. - The tile layout. It draws, in this order:
- a
prBoundary(235/4) rectangle of exactly the 1x2 project area; - every pin of Tiny Tapeout's template on met4 (71/20) and on the met4 pin purpose (71/16), at its fixed position.
The positions come from the official pin table that Undine ships
(
server/undine/data/tt_sky130A_analog.json); - the
VGNDandVDPWRpower stripes on met4, 2 µm wide, from 5 µm above the bottom edge to 5 µm below the top; - the inverter, placed near the analog pads;
- met4 routes and via stacks from the inverter to the pads
ua[0]andua[1]and toVGND, and a met3 route underVGNDto a via stack onVDPWR.
- a
The script uses the same HTTP API as the browser, so you can read it as a recipe for your own tile. Its template
values (die size and pin rectangles) come from undine.checks.tapeout.tt_template("1x2").
Your own design
To tape out your own cell, give it the same two views: a top cell whose schematic connects your cell to ua[n],
VDPWR and VGND, and a layout with the boundary, the template pins and the power stripes. The Tapeout tab in the
next steps tells you what is still missing. The cell can have any name: the panel proposes tt_um_<cell name>
and the export renames the top cell. Naming it tt_um_... yourself keeps the names in Undine and on the shuttle
the same.
3. Open the Tapeout tab
- In the library browser on the left, find
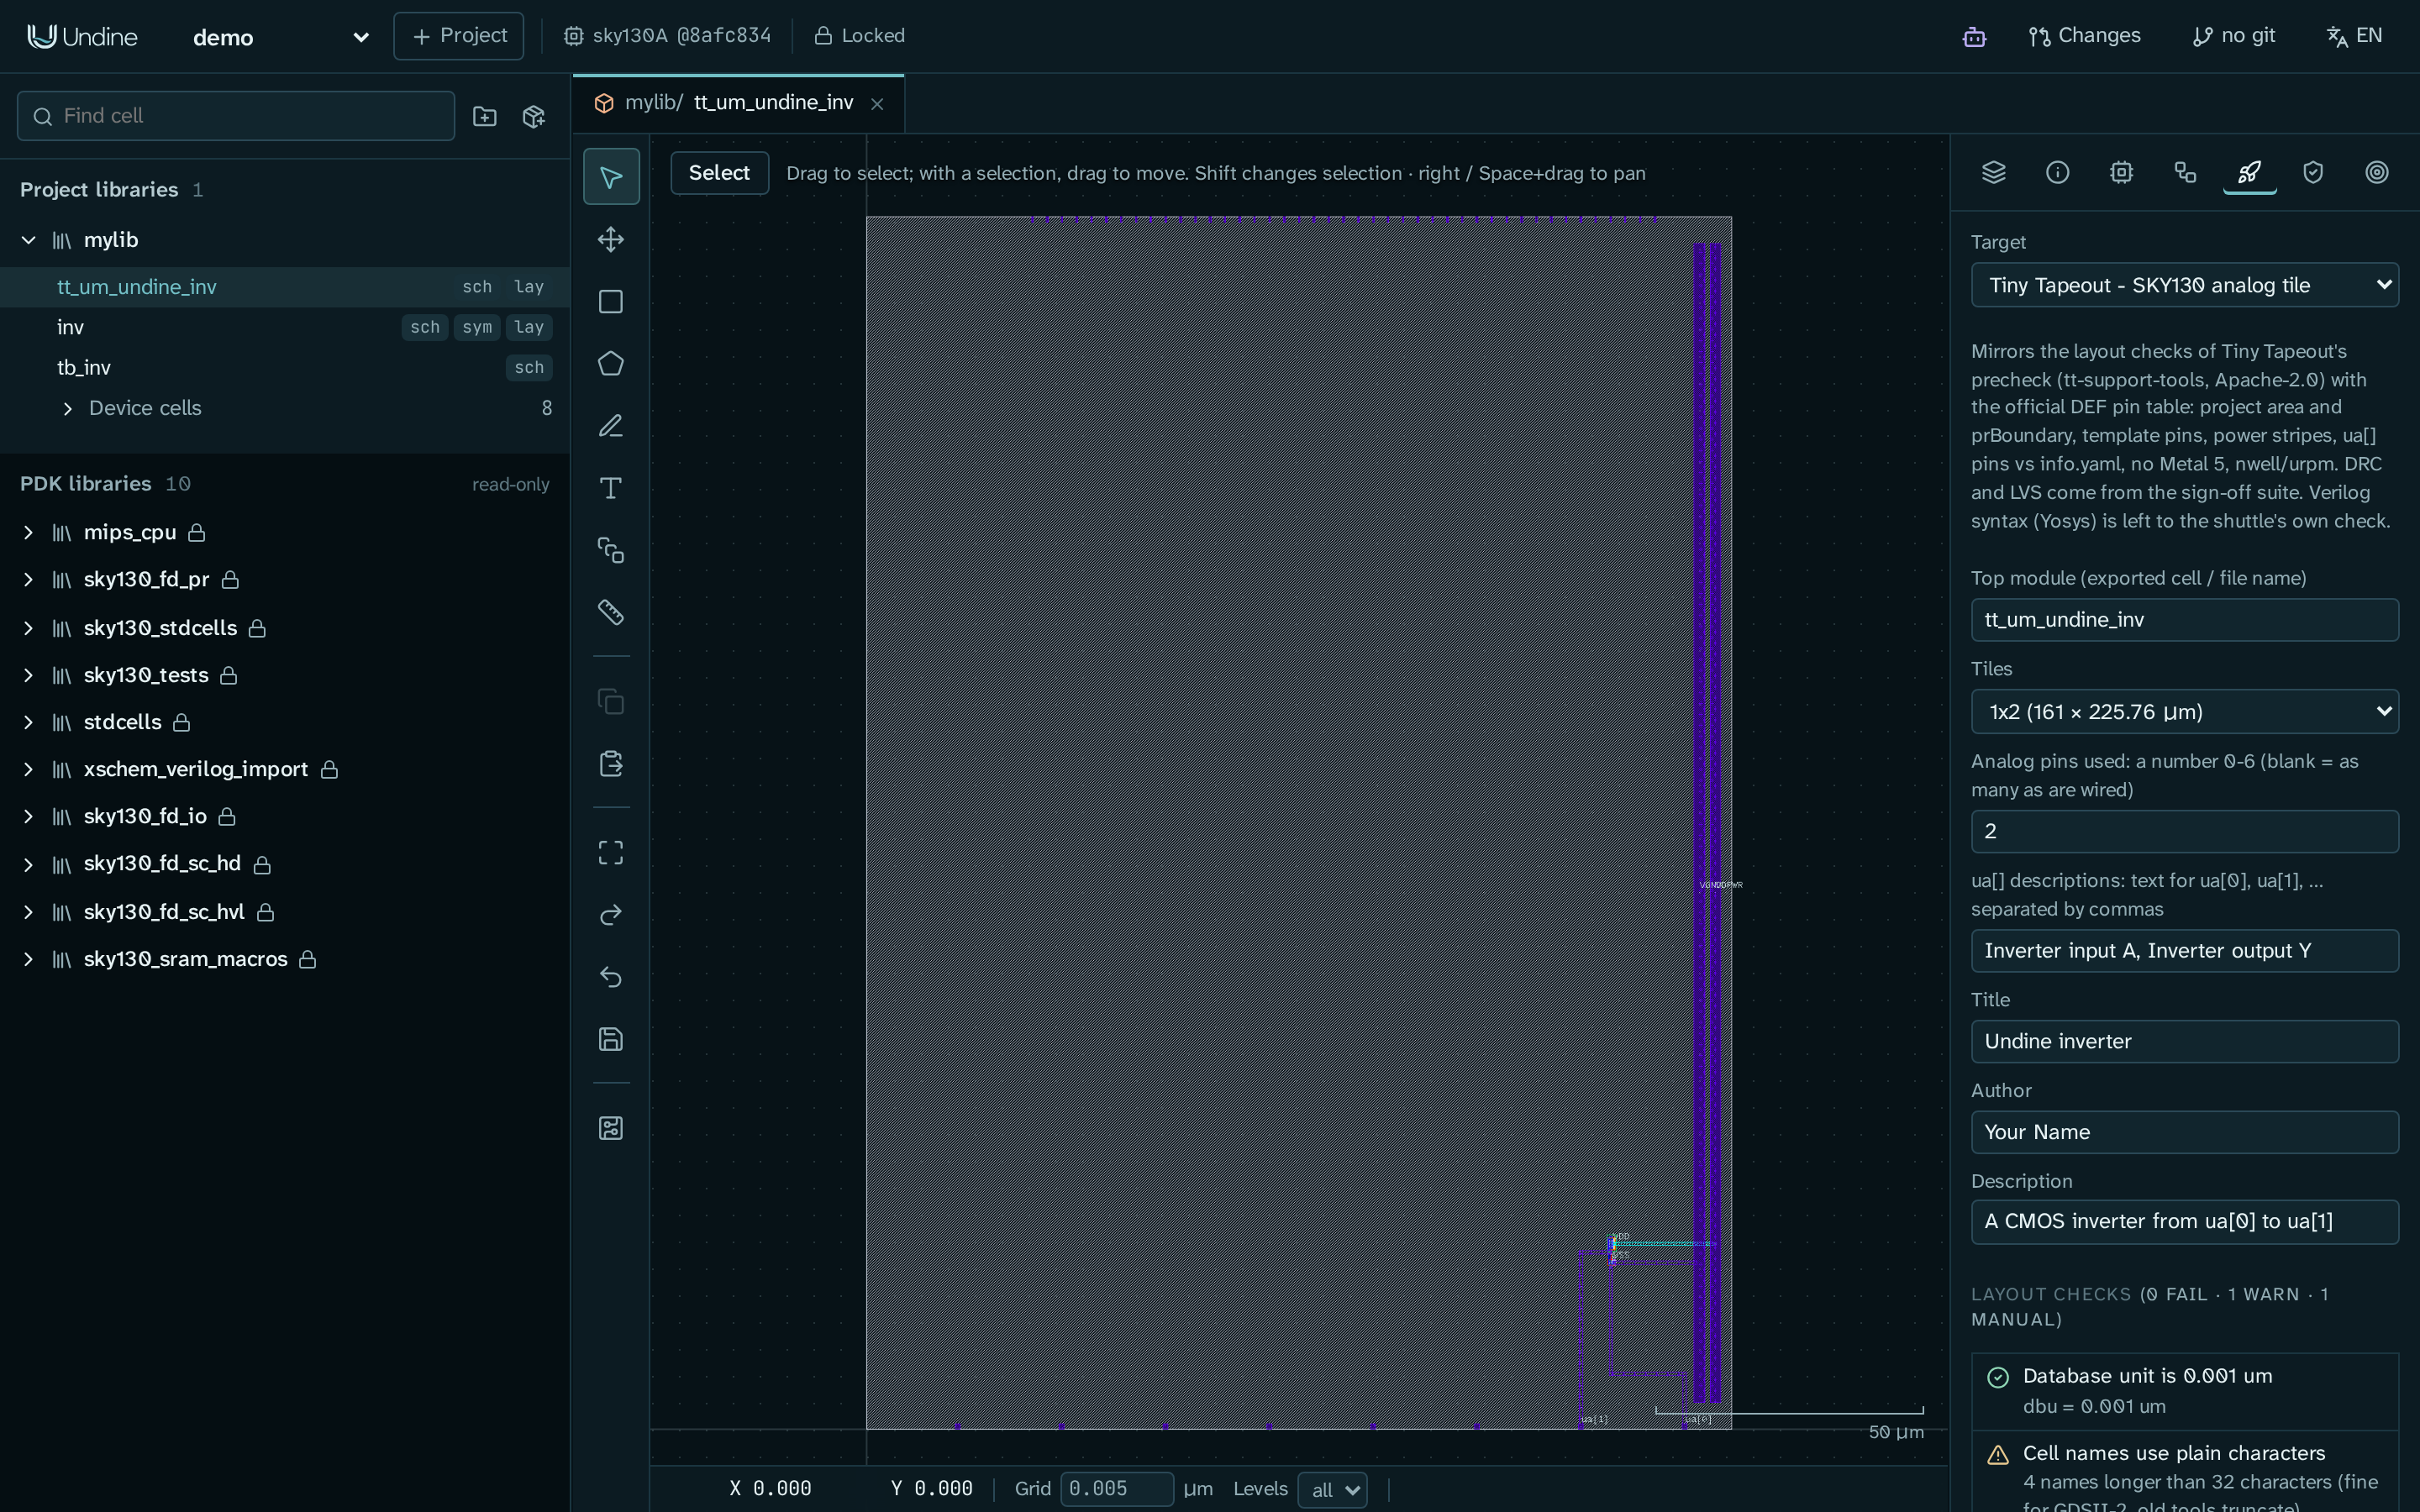
tt_um_undine_invundermyliband clicklaynext to it. The layout editor opens with the whole tile: the hatched project area, the pin row along the top and bottom edges, and the two power stripes on the right. - In the side panel on the right, click the rocket icon. Its tooltip is Tapeout: shuttle checks and bundle. This tutorial calls it the Tapeout tab.
The Target list at the top already shows Tiny Tapeout - SKY130 analog tile. Under it, a note says what the target checks, then come the project information fields, the Layout checks, the Sign-off suite and the Submission bundle.
4. Fill in the project information
The fields become your info.yaml, the file Tiny Tapeout reads to place your tile and to write the datasheet.
The panel also checks them against the layout, so fill them in before you look at the results.
| Field | Goes to | Enter for this tutorial |
|---|---|---|
| Top module | top_module, the top cell name in the GDS, and the file names |
tt_um_undine_inv (filled in for you) |
| Tiles | tiles |
1x2 (161 × 225.76 µm) |
| Analog pins used | analog_pins |
2 |
| ua[] descriptions | pinout: ua[0], ua[1], ... |
Inverter input A, Inverter output Y |
| Title | title |
Undine inverter |
| Author | author |
your name |
| Description | description, and How it works in docs/info.md |
A CMOS inverter from ua[0] to ua[1] |
Some labels in the panel go on with a short hint, for example Analog pins used: a number 0-6 (blank = as many as are wired). The hints say how to fill a field in. In addition:
- Top module must match
tt_um_followed by letters, digits or underscores, and must be unique on the shuttle. Include your GitHub user name, for example. - Analog pins used: use as few as you need, because each one costs extra. Tiny Tapeout connects them in order
from
ua[0], so wireua[0],ua[1], ... in that order. - ua[] descriptions: every used pin needs one, and a description cannot contain a comma.
The layout checks run again when you leave a field (click elsewhere or press Tab).
The fields are not saved
The panel keeps these values only while it is open. They are written into info.yaml when you export the bundle.
If you reload the page or open another cell, enter them again.
5. Read the layout checks
The Layout checks heading shows a count, for example (0 fail · 1 warn · 1 manual). Each check has an icon:
- a green tick: pass;
- a red cross: fail. You cannot export while any check fails;
- an amber triangle: warn. Read it, then decide;
- a grey question mark: manual. Undine cannot verify it from public information, and never reports it as passed.
These checks mirror the layout checks of Tiny Tapeout's precheck (tt-support-tools).
Tapeout lists them all.
For the demo tile you should see:
- Cell names use plain characters: warn,
4 names longer than 32 characters (fine for GDSII-2, old tools truncate). These are the generated PCell names of the transistors and vias. GDSII files from Undine keep them in full, so you can leave them. - Verilog syntax (src/project.v) is checked with Yosys by the shuttle: manual. Undine does not run Yosys; the bundle holds a port stub that Tiny Tapeout's precheck checks.
- Every other check: pass.
To see how the analog pin check works, clear the ua[] descriptions field and leave it. The check ua[n] connect to metal exactly when used (analog_pins) and are described fails, because both used pins now lack a description:
ua[0] has no description (pinout in info.yaml); ua[1] has no description (pinout in info.yaml)
Now set Analog pins used to 1. The ua[1] message changes to ua[1] is connected to metal but analog_pins is 1:
the layout wires two pads, so analog_pins must be 2. Put back 2 and the two descriptions before you go on.
Fix a failing check
The line under each check says what is wrong. Fix the layout in the editor; the checks run again after each edit. The Layout editor guide covers drawing and editing.
6. Run the sign-off suite
The layout checks look at geometry and pins. Design rules and connectivity come from the Sign-off suite: every
KLayout DRC deck of the PDK, Magic DRC, and LVS with KLayout and with Magic + Netgen. For this target, KLayout LVS
runs flat with VGND as the substrate net, as the tile is wired on the chip.
The panel lists seven checks, each marked not run until the suite has run it:
- KLayout
sky130A_mr.drc - KLayout
met_min_ca_density.lydrc - KLayout
pin_label_purposes_overlapping_drawing.rb.drc - KLayout
zeroarea.rb.drc - Magic DRC
- KLayout LVS
- Magic + Netgen LVS
Under Sign-off suite, click Run all checks (KLayout, Magic, Netgen). Each check shows its state while it
runs. For the demo tile the suite takes well under a minute. When it is done, each DRC check shows
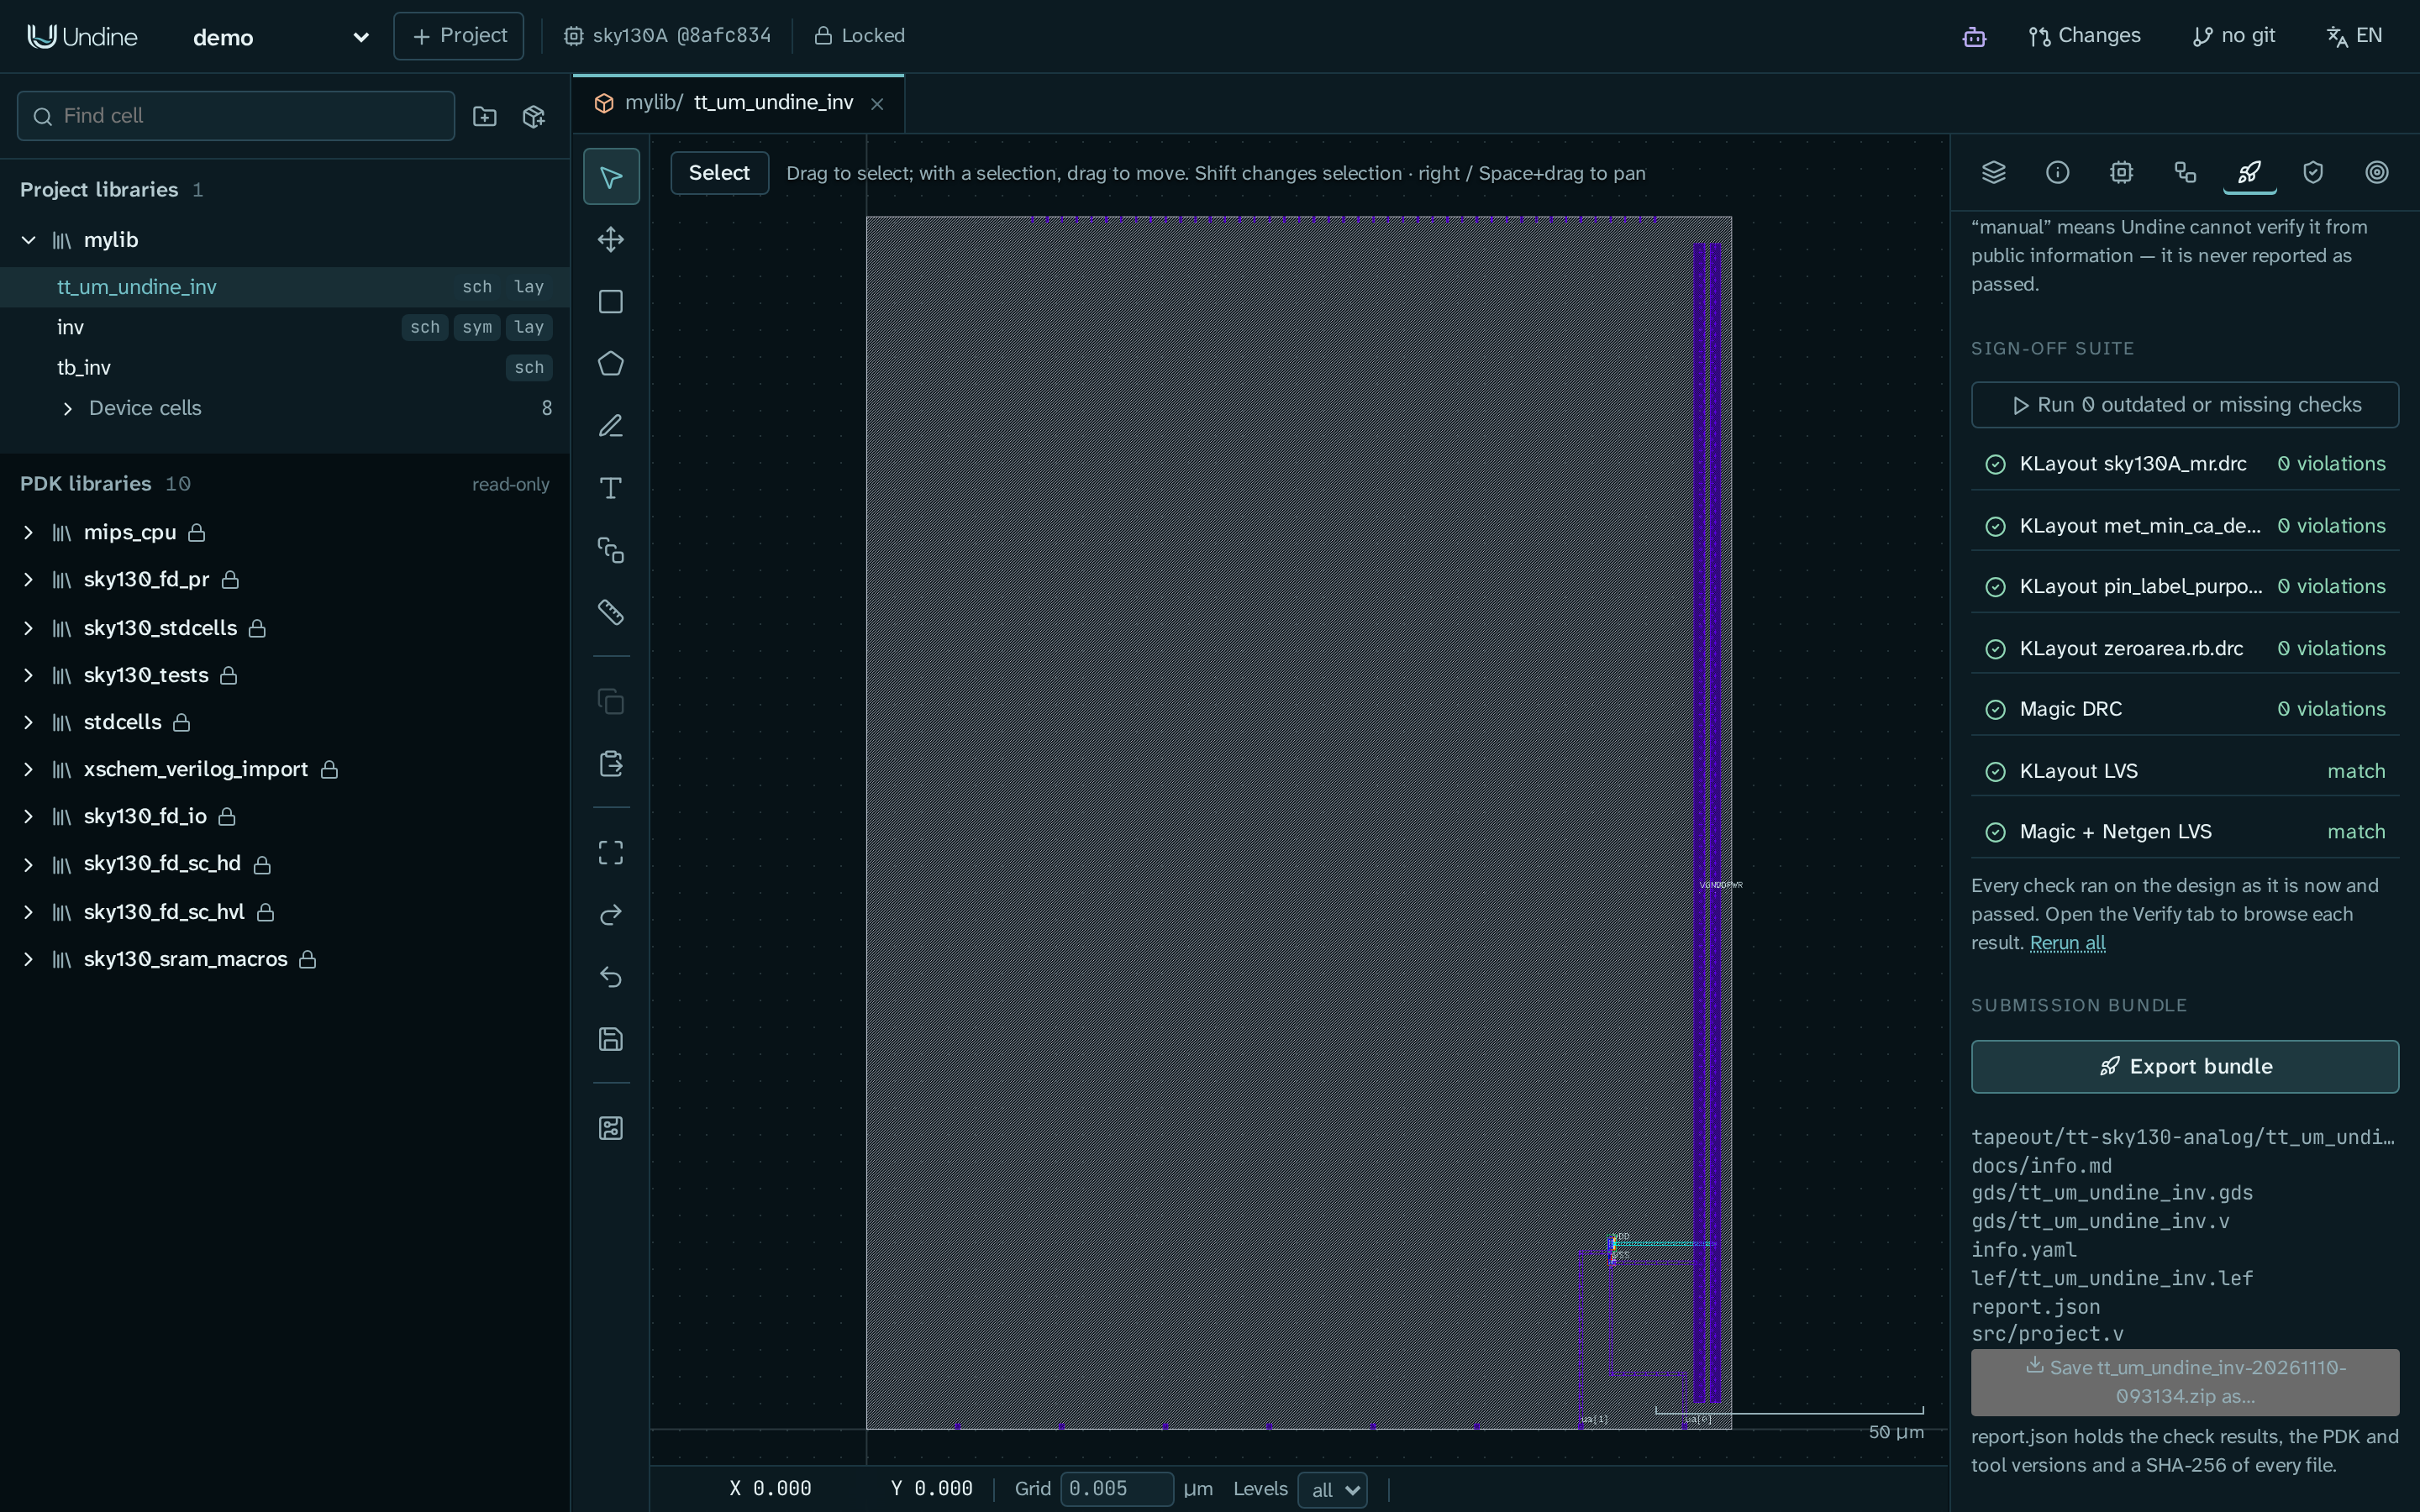
0 violations, each LVS check shows match, and the panel says Every check ran on the design as it is now and
passed.
The panel calls the server's HTTP API, and so can you. Start the suite:
curl -s -X POST http://127.0.0.1:8700/api/p/demo/l/mylib/tapeout/tt_um_undine_inv/suite \
     -H 'content-type: application/json' -d '{"target": "tt-sky130-analog"}'
The answer lists the job started for each check. Ask for their state until none is queued or running:
curl -s 'http://127.0.0.1:8700/api/p/demo/l/mylib/signoff/tt_um_undine_inv?target=tt-sky130-analog'
Each entry has state, passed, fresh (it ran on the design as it is now) and a summary with the violation
count or the LVS verdict. A check that ended failed or cancelled is finished but did not pass. Check that every
entry has "passed": true. The HTTP API reference describes the server's interface.
To look at a result in detail (rules, markers in the layout, LVS cross-references), open the Verify tab: the shield icon next to the rocket, with the tooltip DRC / LVS. The panel's own text calls it the Verify tab. The Verification guide explains it.
When you change the design later, the checks it affects are marked outdated, with what changed, and the button runs only the outdated or missing checks. It reads Run N outdated or missing checks when some results are still current (a schematic change outdates only the two LVS checks), and Run all checks (KLayout, Magic, Netgen) after a layout edit, which outdates every check. Tapeout and Outdated results explain how Undine decides that a result is current.
If a check reports a missing tool, see Troubleshooting.
7. Export the submission bundle
Under Submission bundle, click Export bundle.
Undine writes the bundle into the project and downloads it as a zip. In Chrome and Edge a dialog asks where to
save the zip; other browsers save it to your downloads folder. The panel then lists the folder and its files. To
download the zip again, click Save tt_um_undine_inv-
Put the target and the project information in a file, export.json:
{
  "target": "tt-sky130-analog",
  "params": {
    "top_module": "tt_um_undine_inv", "tiles": "1x2", "analog_pins": "2",
    "ua": "Inverter input A, Inverter output Y",
    "title": "Undine inverter", "author": "Your Name",
    "description": "A CMOS inverter from ua[0] to ua[1]"
  }
}
Then export:
curl -s -X POST http://127.0.0.1:8700/api/p/demo/l/mylib/tapeout/tt_um_undine_inv/export \
     -H 'content-type: application/json' -d @export.json
The answer gives the folder (dir), the zip name (zip) and the files. If a layout check fails, the server
refuses with not exporting: failing checks: ... and the checks that fail. See the
HTTP API reference.
The folder is <project>/tapeout/tt-sky130-analog/tt_um_undine_inv-<date>-<time>/ in the project directory, and the
zip is next to it. It holds:
| File | What it is |
|---|---|
gds/tt_um_undine_inv.gds |
The layout, with the top cell named after Top module |
gds/tt_um_undine_inv.v |
A copy of the port stub, next to the GDS, where the precheck looks for it |
lef/tt_um_undine_inv.lef |
A pin-only abstract: all template pins and the power stripes |
src/project.v |
The Verilog port stub of the module (ports only; the circuit is the layout) |
info.yaml |
The project information from step 4, in Tiny Tapeout's format (yaml_version: 6) |
docs/info.md |
A datasheet page to complete: How it works, How to test, External hardware |
report.json |
The record of the export: PDK and tool versions, check results, sign-off status, file hashes |
Tapeout describes report.json in full.
Export does not wait for the sign-off suite
Export bundle is disabled while a layout check fails (Fix the failing checks first.), but it does not
require the sign-off suite. Before you submit, check that the panel says Every check ran on the design as it is
now and passed. You can also read signoff in report.json: every entry should have "passed": true and
"fresh": true.
8. Submit on Tiny Tapeout
Undine stops at the bundle. The rest happens on GitHub and on the Tiny Tapeout website, and Tiny Tapeout's own precheck is the judge. The steps below follow Tiny Tapeout's analog specs page; read it first, because shuttles, templates and prices change.
- Create your repository. Open the analog template for SKY130, TinyTapeout/ttsky-analog-template, and choose Use this template. Clone your new repository.
-
Copy the bundle into it. Unzip the bundle and copy its files over the template's:
# in the folder that holds your repository
unzip tt_um_undine_inv-<date>-<time>.zip
cd my-tt-project                               # your repository
cp -r ../tt_um_undine_inv-<date>-<time>/{gds,lef,src,docs,info.yaml} .
This replaces the template's
info.yaml,src/project.vanddocs/info.md. Compareinfo.yamlwith the template's version before you commit: the template's comments explain each key, and the generated file asks you to check it against the current template. Leavereport.jsonout of the repository, or keep it for your own records. 3. Complete the datasheet. Editdocs/info.md: say how the circuit works, how to test it (which pins, which levels) and what external hardware it needs. 4. Turn on GitHub Actions and Pages for the repository (see Tiny Tapeout's FAQ), then push. The template's workflows package the GDS and LEF (gds), run Tiny Tapeout's precheck on them (precheck), publish a GDS viewer (viewer) and build the datasheet (docs). The precheck runs the checks that Undine mirrors, plus the ones it reports as manual, such as Yosys onsrc/project.v. 5. Submit. When the actions pass, submit the repository at app.tinytapeout.com. Analog projects pay for their tiles and for each analog pin; the analog specs page gives the current prices.
Before you submit a real design
Undine's checks cover the layout rules of the precheck. Tiny Tapeout's analog specs ask for more, which no precheck can see:
- Tie the unused digital outputs to
VGND. Do not leaveuo_out,uio_outoruio_oefloating. The demo tile leaves them unconnected, because it only shows the flow: wire them before you submit your own tile. - Respect the analog path limits (series resistance, capacitance and current per pin) given on the analog specs page.
- Use the 3.3 V template only if you need
VAPWR. Undine's tile uses the 1.8 V template and writesuses_vapwr: false.
Other shuttles
The Tapeout tab has the same layout checks, sign-off suite and submission bundle for the other targets in the Target list:
- wafer.space - GF180MCU die: a whole die on gf180mcuD. See wafer.space - GF180MCU die.
- ChipFoundry - Caravel user project (SKY130): Caravel's digital or analog user project wrapper. See ChipFoundry - Caravel user project.
- Layout hygiene only (any shuttle): the basic checks every shuttle needs. See Layout hygiene only.
What you learned
- A Tiny Tapeout analog tile is a top cell
tt_um_...with a wrapper schematic and a layout that has the project boundary, the template pins on met4 and the power stripes.examples/make_tt_inverter.pybuilds one through the HTTP API. - The Tapeout tab checks the layout against the precheck's layout rules and checks the project information against the wiring.
- Run all checks runs DRC and LVS with KLayout, Magic and Netgen, and later runs only what is outdated.
- Export bundle writes the files your Tiny Tapeout repository needs, with a
report.jsonthat records the PDK, the tools, the checks and a hash of every file.
Next steps
- Tapeout: every check of every target, and what each bundle holds.
- Verification: DRC and LVS results, Magic and Netgen, and outdated results.
- Layout editor: draw and edit your own tile.
- Changesets: let an AI agent propose the layout fixes, and review them before you tape out.
- HTTP API: the server's interface that the panel and the example scripts use.
- Data layout and operation log: where the bundles and job results live in the project.
- Troubleshooting: missing tools, PDK problems and LVS failures.