Design with an AI agent
In this tutorial you have an AI agent size a cell for you, and you stay in charge of the result. You write down what the cell has to achieve as its design intent, ask Claude (in Claude Desktop or Claude Code, connected to Undine over MCP) to meet it, watch the proposal grow in Undine, check it, and then adopt it or revert it.
The cell is the CMOS inverter inv that examples/make_inverter.py draws, as in
First project, made fresh in a library of its own, agentlib, so that your
mylib stays as it is. As drawn, the inverter is too slow for the delay specs you are about to give it. When you
finish, you have:
- a design intent on
agentlib/inv: a goal, a preference, a must constraint and two delay specs measured on the testbenchtb_inv; - a changeset in which the agent resized the two transistors, with its reason on every edit and the specs met;
- that change adopted into your design as a git merge commit, and then reverted again, so you know the way back.
The agent never changes your design itself. Everything it does goes into a changeset, a git branch with its own working copy, and nothing reaches your design until you click Adopt.
Before you start
You need:
- Undine installed, with the sky130A PDK and ngspice. See Install;
./setup.sh check(orpixi run doctor) tells you what is missing. - A project on sky130A. This tutorial uses the project
demofrom First project, which ends by putting it in git; any project on sky130A works. - Claude Desktop or Claude Code, signed in. You connect it to Undine in step 3, following Connect an AI agent.
No API key is needed: with MCP the AI app you already use does the thinking, and Undine only offers it tools. If you would rather chat inside Undine, see The in-app Agent instead at the end.
The numbers in this tutorial
The delays below are what ngspice gives for the inverter as examples/make_inverter.py draws it (M1 2 µm, M2 1 µm,
both 0.15 µm long) into the 20 fF load of tb_inv, at the typical corner. An agent is not a script: Claude may pick
other widths than the ones shown, take other steps, or word its replies differently. What stays the same is the
flow, and that you decide.
1. Start Undine with MCP and open the cell
Start Undine with MCP turned on, so that an AI app can reach its tools:
cd ~/undine-eda
UNDINE_MCP=1 pixi run serve
Already running without MCP?
Stop it (Ctrl+C in its terminal) and start it again as above. With ./scripts/restart.sh, use
UNDINE_MCP=1 ./scripts/restart.sh.
In a second terminal (the server keeps running), make the inverter and its testbench in a new library agentlib:
cd ~/undine-eda
pixi run python examples/make_inverter.py demo agentlib  # schematic inv, its symbol, and the testbench tb_inv
You should see three lines, wrote .../libs/agentlib/inv.sch, inv.sym and tb_inv.sch. The script creates the
library when it does not exist.
Why not mylib/inv?
The inverter of First project also has a routed layout, and the Tiny Tapeout tile tt_um_undine_inv places it.
Resizing its transistors would leave that layout behind, and its LVS would fail. Resizing a cell with a layout is a
good second exercise (If the cell has a layout), but a schematic-only cell keeps the
first run short.
Open http://127.0.0.1:8700, choose the project demo, and reload the page (F5) so that the library browser shows
agentlib under Project libraries. Expand agentlib and click inv (its name, not the small sch button).
This opens its cell page: the cell's intent at the top under What it has to do, then its Views, with
tb_inv listed as its testbench. For now the intent is empty: No intent yet: state the cell's goals, preferences and specs.
2. Write the design intent
The design intent tells the agent what the cell is for. The agent reads it every time it works on the cell, works from it, and never relaxes a must constraint or a spec on its own: it proposes such a change instead. The more precisely you state it, the less the agent has to guess. Cells, intent and views explains the two levels of intent; this tutorial uses only the cell intent.
On the cell page of inv:
- Click Edit intent. The Design intent editor opens.
- Click YAML in the editor's header. The intent appears as text.
-
Replace the text with the following and click Save YAML. A toast says Intent updated.
items: - {id: g1, kind: goal, text: Equal rising and falling delays} - {id: p1, kind: preference, text: The smallest total transistor width that meets the specs} - {id: c1, kind: constraint, strength: must, text: Keep L at 0.15 um on both transistors} - id: s1 kind: spec text: Rising output delay at most 60 ps into 20 fF spec: measure: tplh max: 60.0e-12 testbench: tb_inv meas: .meas tran tplh TRIG v(in) VAL=0.9 FALL=1 TARG v(out) VAL=0.9 RISE=1 - id: s2 kind: spec text: Falling output delay at most 60 ps into 20 fF spec: measure: tphl max: 60.0e-12 testbench: tb_inv meas: .meas tran tphl TRIG v(in) VAL=0.9 RISE=1 TARG v(out) VAL=0.9 FALL=1 -
Click Close the editor.
Each entry under items is one item:
| Item | Kind | What it tells the agent |
|---|---|---|
g1 |
goal | a direction to optimise: rise and fall as close as possible |
p1 |
preference | how to trade off: no more width than the specs need |
c1 |
constraint, must | a rule it has to respect: do not touch L |
s1, s2 |
spec | a measure with a limit and the testbench that checks it |
Each spec runs tb_inv (its 20 ns transient) with one extra .meas statement, added to that run only, so the testbench
itself stays as it is. tplh is the delay from the input falling through 0.9 V to the output rising through 0.9 V;
tphl is the other edge. Limits are in SI units: 60.0e-12 is 60 ps.
You should now see the items under What it has to do, the specs with their measures (tplh ≤ 6e-11 (tb_inv)),
Ready for simulation, and on the tb_inv row measures s1, measures s2, places inv:
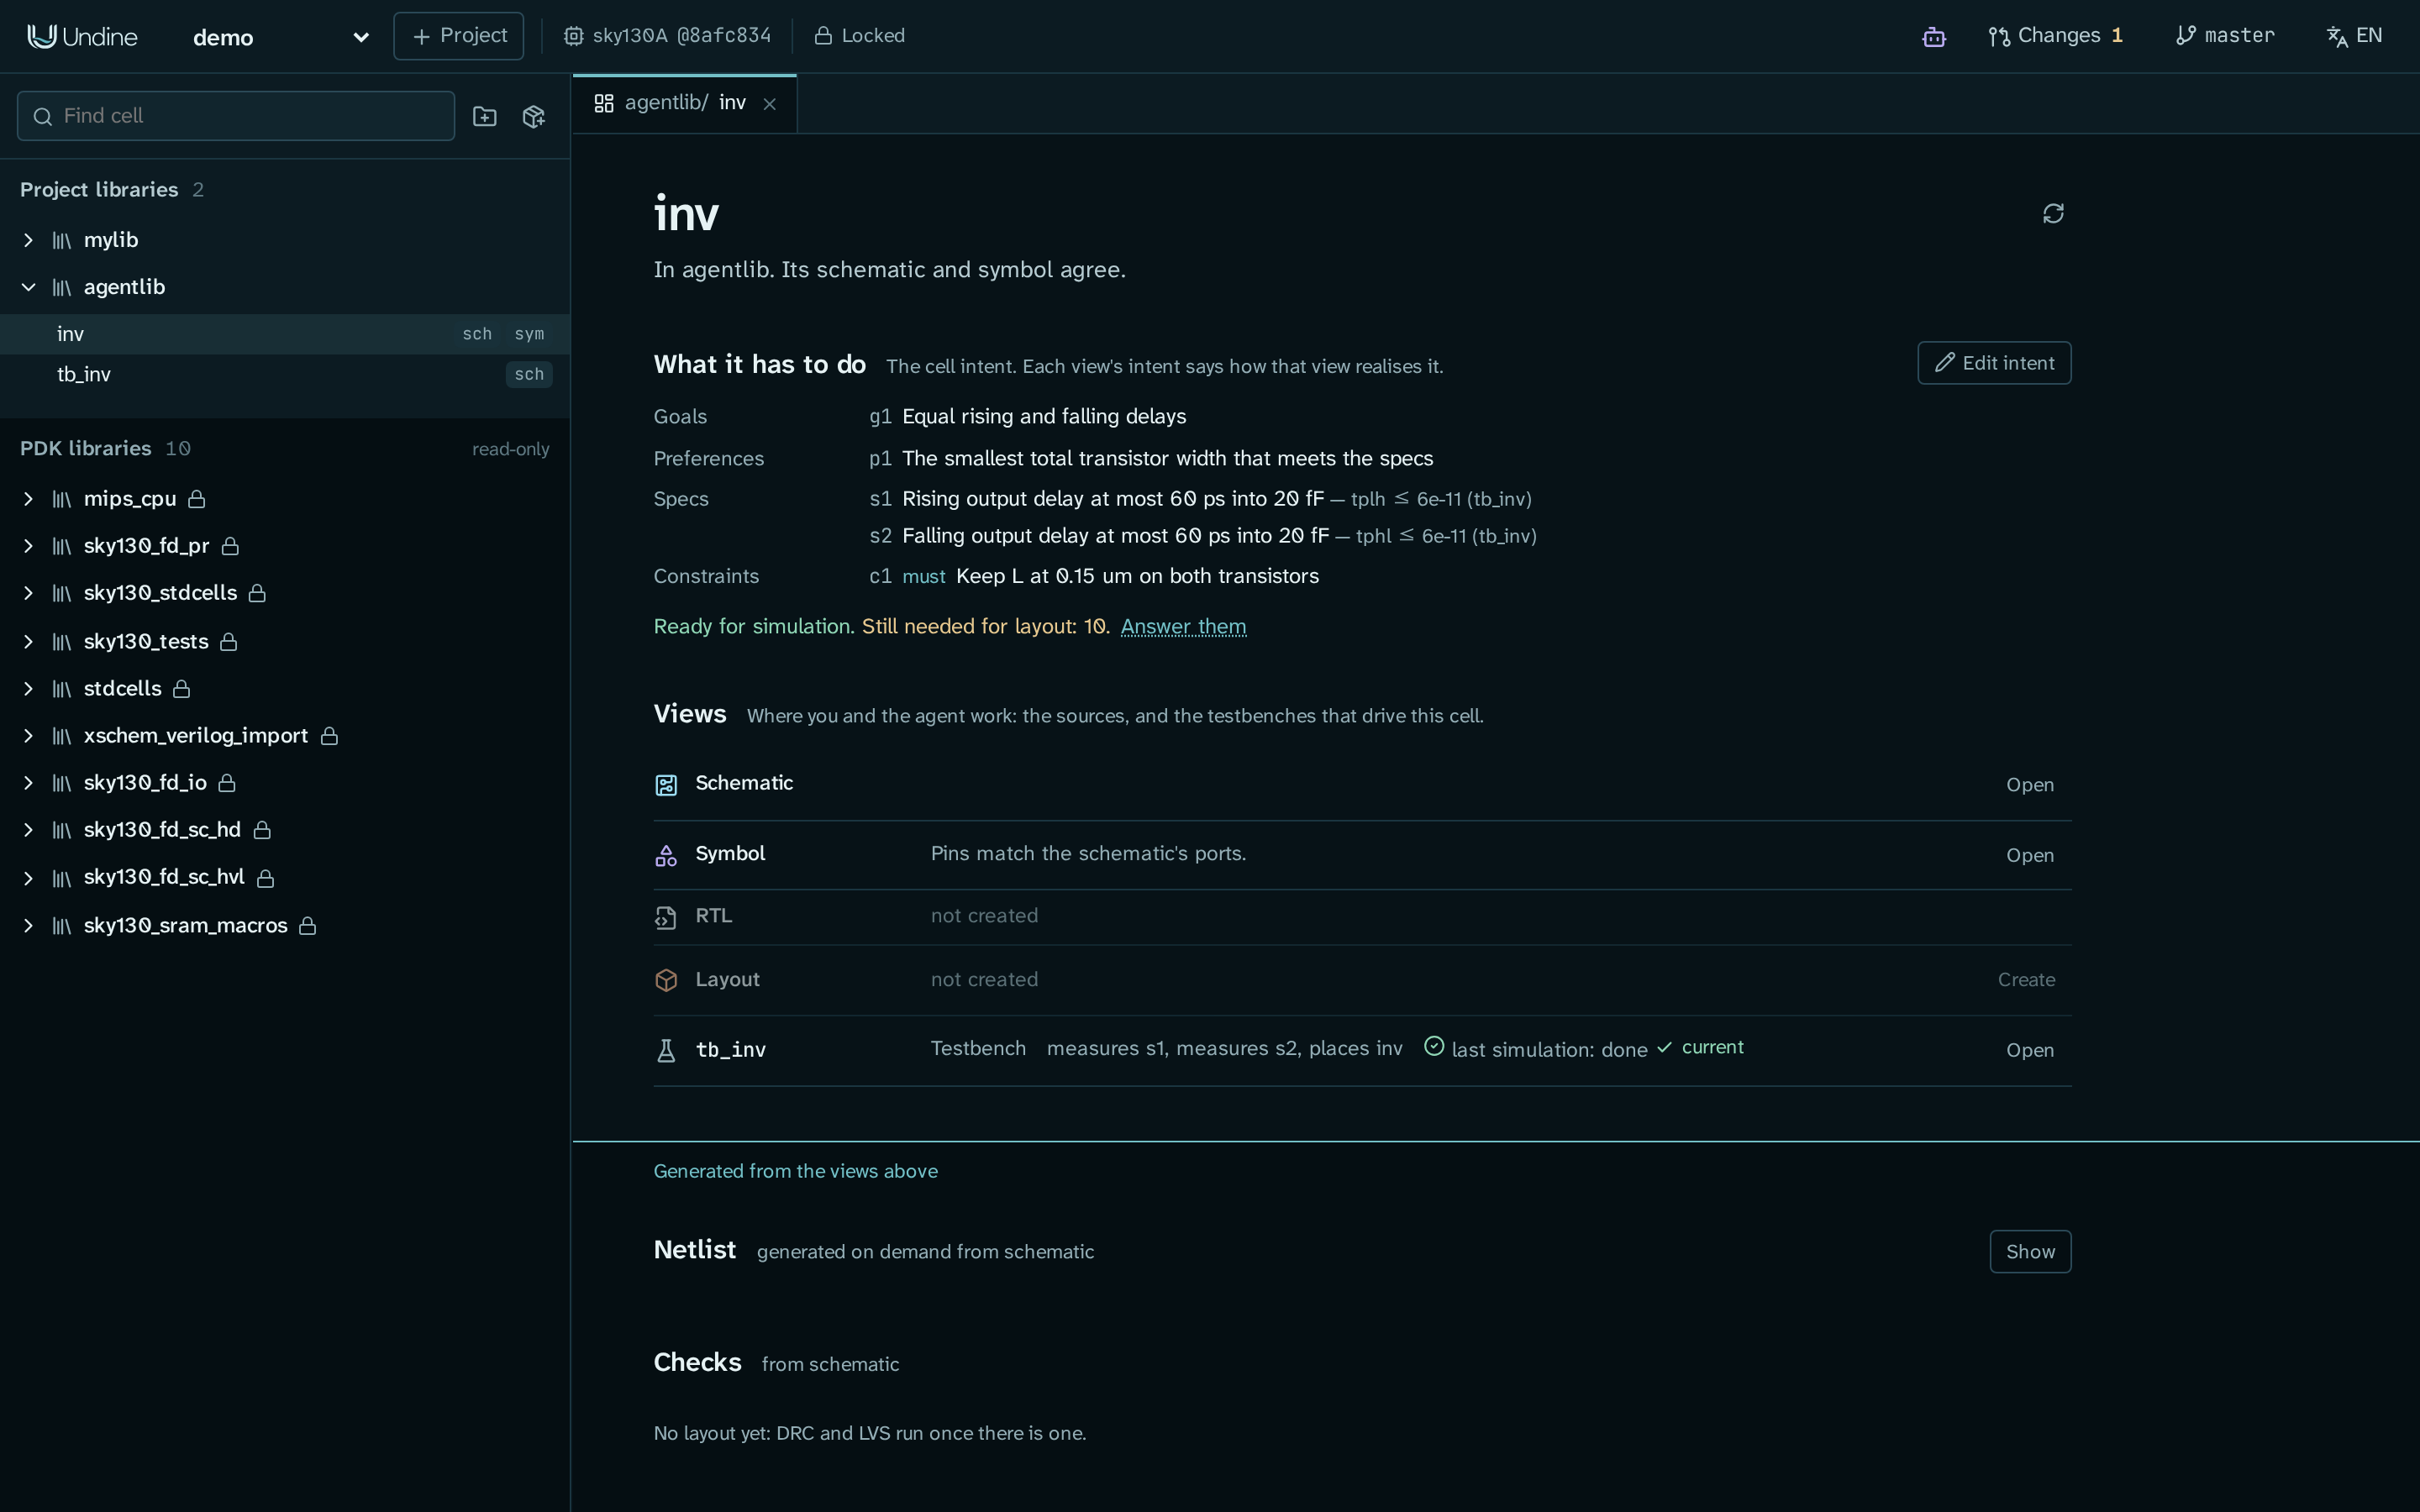
Still needed for layout counts what the layout steps would need (port sides, for example). This tutorial changes only the schematic, so you can leave those open.
Simple specs without YAML
The editor's form (Add under Add to the intent) adds goals, preferences, constraints and specs with a
Measure, Min, Max and Testbench: enough for a measure the testbench already has, such as a .meas
of its own or v(out) of an operating point. A spec that brings its own .meas statement, as here, is written in
YAML. You can also tell the agent your requirements in words and let it record them (see
Example prompts); they then arrive as part of its changeset, for you to review.
Finally, commit the new cell and its intent. First project put demo in git, and what you made since is not committed
yet:
cd ~/undine-projects/demo
git add -A
git commit -m "agentlib: inv, tb_inv and the intent of inv"
git status should then say nothing to commit, working tree clean. Adopting and reverting (steps 8 and 9) commit their merge only when nothing else in the project is uncommitted, so a
clean start lets them make commits of their own. If your project is not in git yet, skip this: when the agent opens its
changeset, Undine puts the project in git and commits its files as they are.
3. Connect your AI agent
Follow Connect an AI agent, part A:
A1 for Claude Desktop,
A2 for Claude Code. Come back here once Claude answers a question such
as "In the Undine project demo, list the cells of library agentlib." with inv and tb_inv.
For Claude Code, the short version is:
claude mcp add --scope user undine -- ~/undine-eda/.pixi/envs/default/bin/python -m undine mcp-stdio
claude mcp list                                   # undine: ... - ✔ Connected
pixi run python -m undine skills install          # optional: Undine's guide for agents, as a Claude Code skill
Then start a new Claude Code session (claude in a terminal), so that it picks up the server.
Fewer permission prompts
Claude Code asks before it uses each Undine tool. Undine's tools only read the design or write into a changeset, so you can allow them all at once: see Optional: allow all of Undine's tools at once in A2.
If Claude does not see Undine's tools
See the troubleshooting table of Connect an AI agent and
AI agents and MCP in Troubleshooting. The most common causes are a
Claude Code session started before you registered Undine, and an Undine started without UNDINE_MCP=1.
4. Ask the agent to size the cell
Keep the browser with Undine and the chat side by side. Send Claude this prompt:
In the Undine project
demo, the inverteragentlib/invmisses its delay specs. Size it to meet its design intent: first measure the specs as the cell is now, then explore the transistor widths withsweep, set the widths you choose in a changeset, confirm them withcheck_specsand runrun_checks. Do not change anything the intent does not allow. When you are done, tell me the delays before and after, and why you chose those widths.
Naming the tools is optional (Claude finds them in Undine's guide), but it makes the steps predictable. Claude now works through Undine's tools. A typical run looks like this; the names are the tools you see in the chat:
get_design_contextorget_intent: it reads the cell and its intent, includingc1(must) and the two specs.check_specs: it measures the specs as the cell is. Both miss: about 83 ps fortplhand 68 ps fortphl.sweep: it simulates combinations ofM1.WandM2.Wwithout editing anything, and ranks them by their worst margin. WithM1.W2, 3, 4, 6 andM2.W1, 1.5, 2, 3, the smallest pair that meets both specs is M1 4 µm and M2 1.5 µm (about 56 ps and 55 ps: equal delays, asg1asks).open_changeset: it opens a changeset with a title and a reason. If the project was not in git yet, this first puts it in git and commits its files as they are (Claude tells you so).set_instance_params: it sets the new widths, each with a reason that names the spec it serves.check_specsagain, now on its working copy: both specs are met.run_checks: DRC and LVS before and after the change.invhas no layout yet, so this checks only the schematic (its symbol against its ports).
Then Claude replies with a summary. For example (your wording and numbers may differ):
Both delay specs are now met in changeset cs-35ae0c ("Size inv for s1 and s2"):

            before (M1 2 / M2 1 µm)   after (M1 4 / M2 1.5 µm)   spec
  tplh      82.6 ps                   56.2 ps                    ≤ 60 ps  (s1)
  tphl      67.8 ps                   55.1 ps                    ≤ 60 ps  (s2)

L stays 0.15 µm (c1). M1 = 3 µm gives a 65 ps rise, so 4 µm is the smallest pull-up on
this grid; with M2 = 1.5 µm the two delays are within 1 ps (g1). Total width 5.5 µm (p1).
Please review it in Undine; I cannot adopt it.
5. Watch the changeset fill
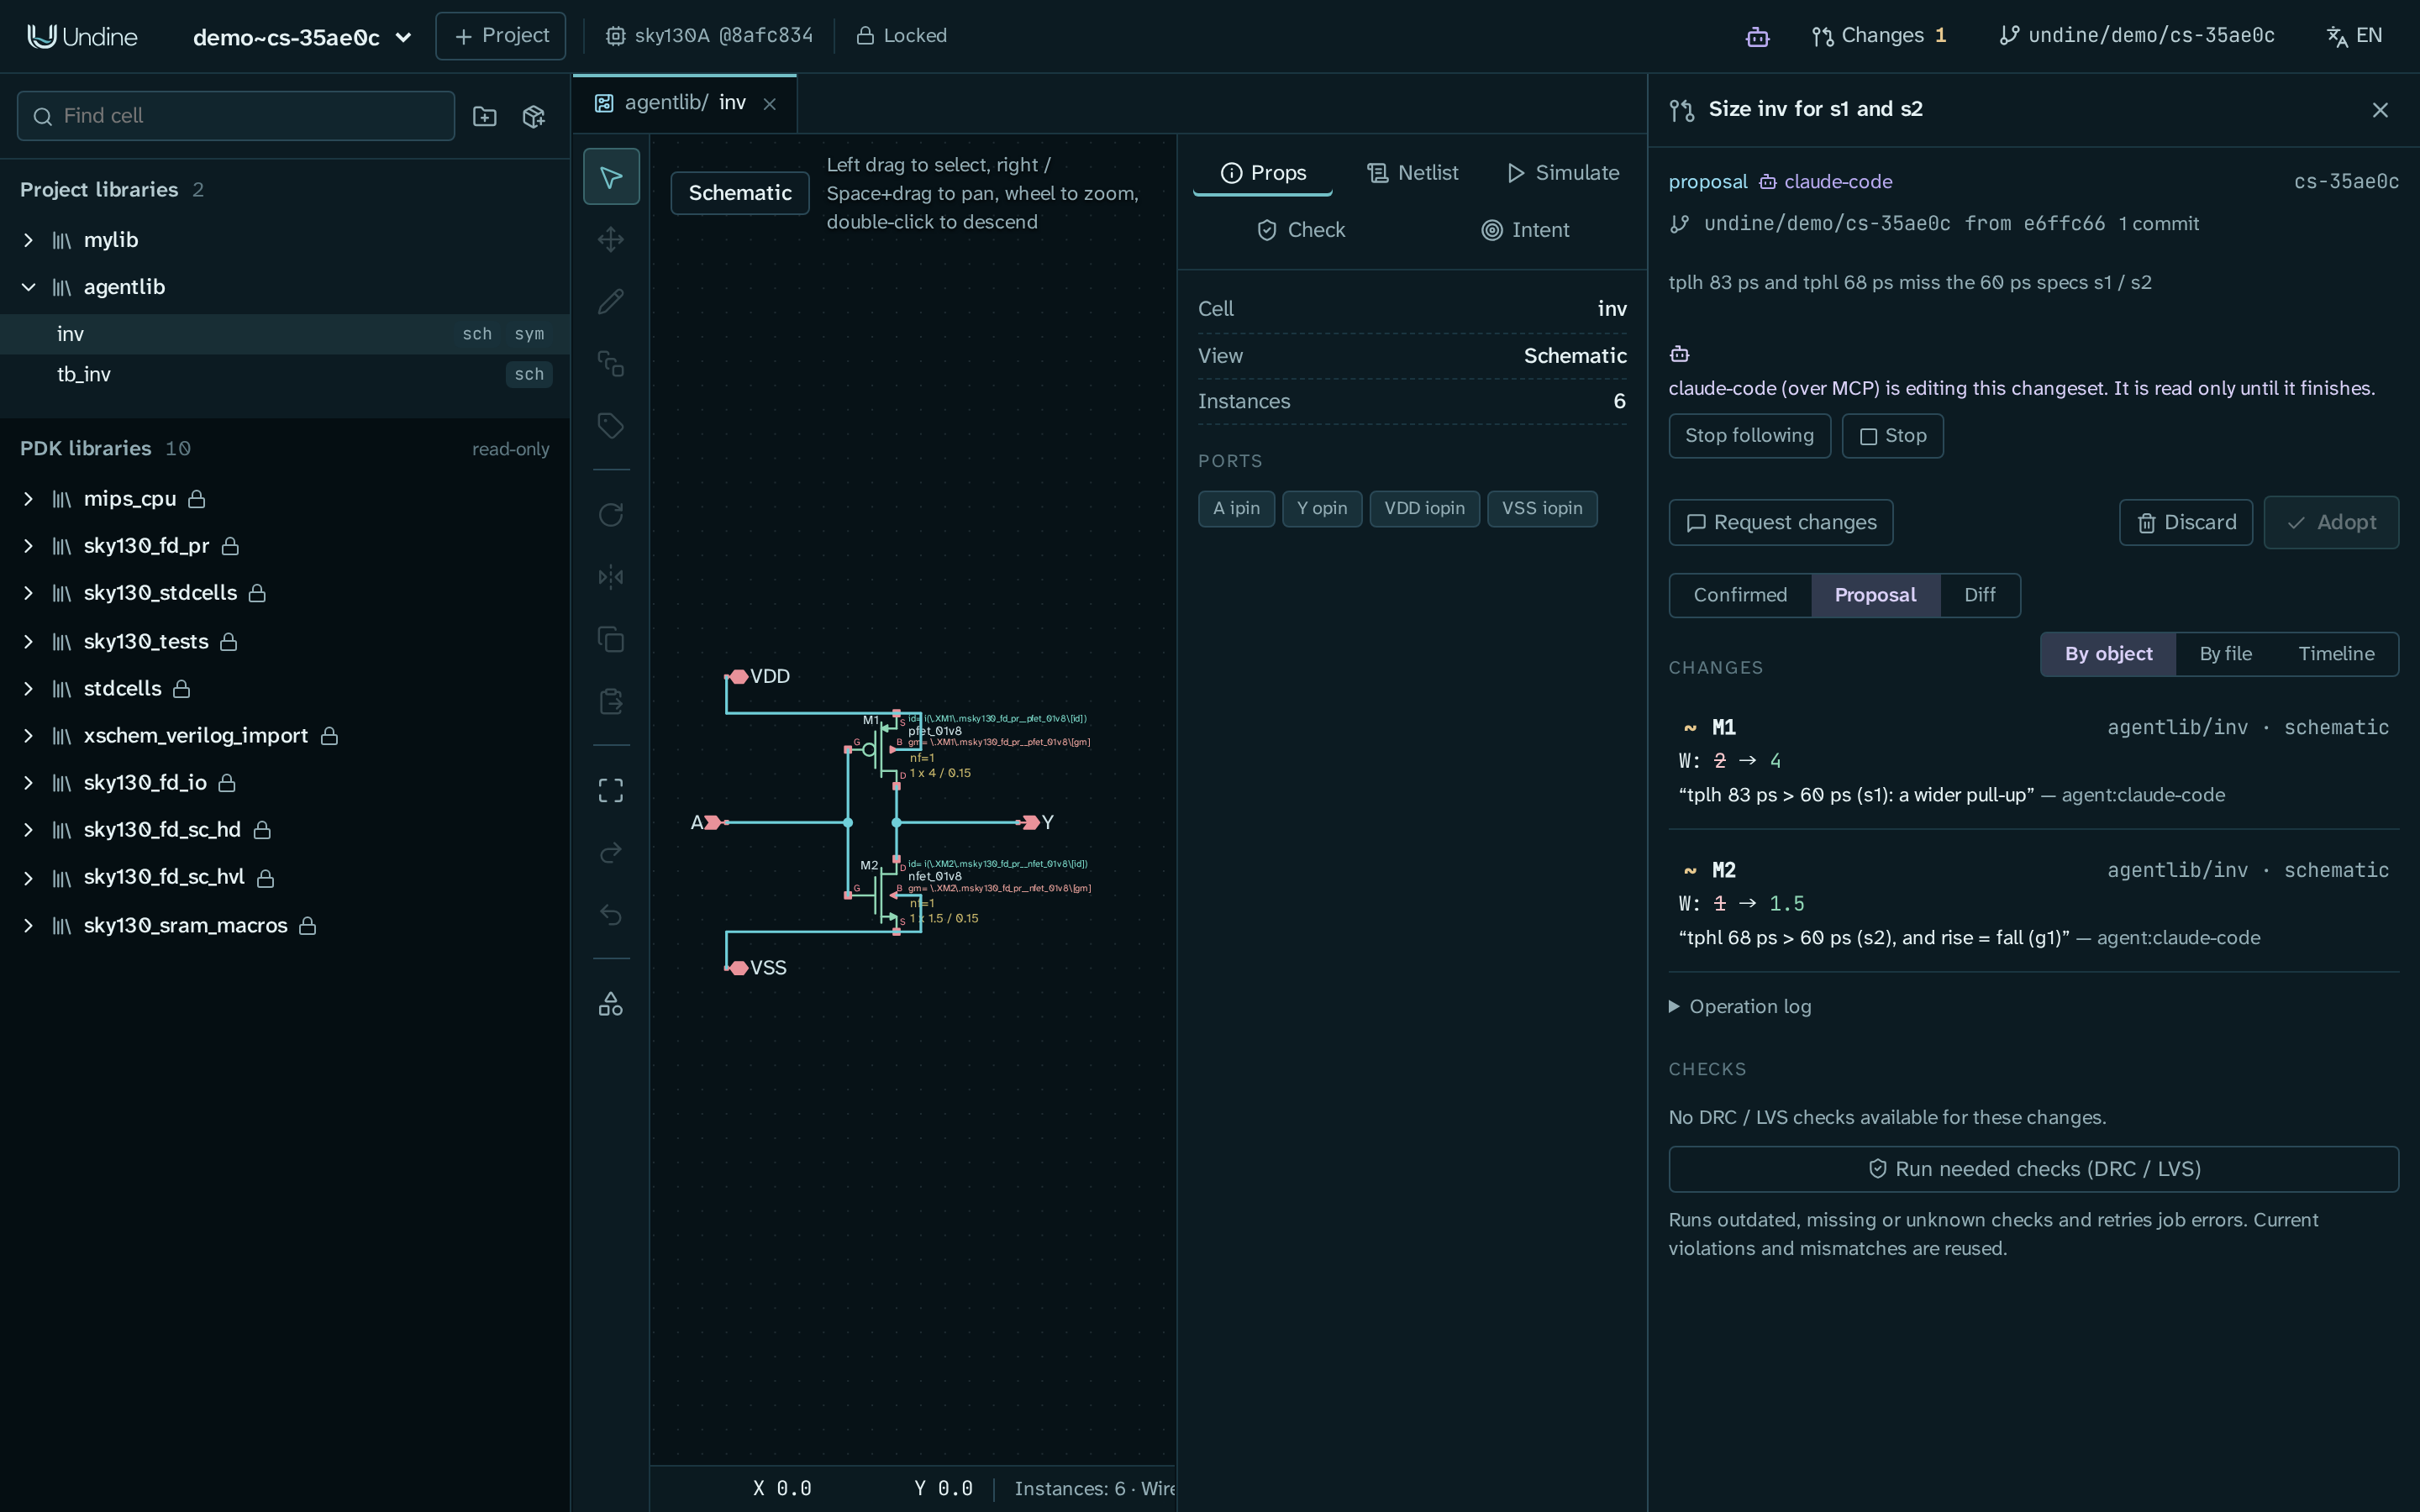
When Claude makes its first change, Undine shows it at once. In the Undine tab you opened in step 1, the changeset's review opens on the right and the drawing in the middle switches to the proposal, as in the picture at the top of this page. The review names the writer: claude-code (over MCP) is editing this changeset. It is read only until it finishes.
Each edit appears in the review as it lands: M1 W: 2 → 4, with the reason Claude gave. The drawing follows the cell
the agent edits. Stop in the review stops the agent: its next write is refused, and what it already changed stays in
the changeset. When Claude stops writing, the is editing line goes and the review becomes an ordinary one.
If the tab was busy when the agent started (a review open, or edits not saved), Undine shows a bar with Watch
instead of taking the screen over. Watching an external agent in Undine
describes that case and the others: following and pausing, the bar with Review when the agent has finished, and the
browser tab that Undine's launcher (mcp-stdio, which the AI app starts) opens when no Undine tab has the project open.
6. Check the result yourself
The agent's numbers are a claim. Check them before you adopt. The specs can be measured again on the changeset without taking it over:
cd ~/undine-eda
pixi run python -m undine call check_specs lib=agentlib cell=inv changeset=cs-35ae0c fresh=true \
  --project demo --session me
pixi run python -m undine session end --session me
Use your changeset's id (it is in the review's header and in Claude's reply). changeset= reads and checks that
changeset's working copy without becoming its writer, fresh=true runs the simulations again instead of reusing
the agent's runs, and --session me keeps your calls apart from the agent's. undine call keeps that session
between calls, so that a changeset it opens stays its own; session end lets it go, as this check needs nothing
kept. You should see "changeset": "cs-…" first, then each spec with "status": "met" and its measured worst
value, and after the list of specs "met": "2/2".
In the review, switch the drawing to Proposal, open tb_inv from the library browser (the preview shows
the proposal's working copy), and click Run ngspice in its Simulate tab. You see the waveforms of in
and out with the new widths. The spec measurements themselves come from check_specs (the Command line tab,
or ask Claude to run it).
You can also ask the agent to go further, for example at every corner:
Run
check_specsonagentlib/invin your changeset atcorners: ['all']andtemps: [-40, 27, 125], and tell me the worst case of each spec and where it is.
7. Review the changeset
Now read the proposal itself. The review on the right has everything; open it from Changes in the top bar if it is closed. Click Diff above the list of changes.
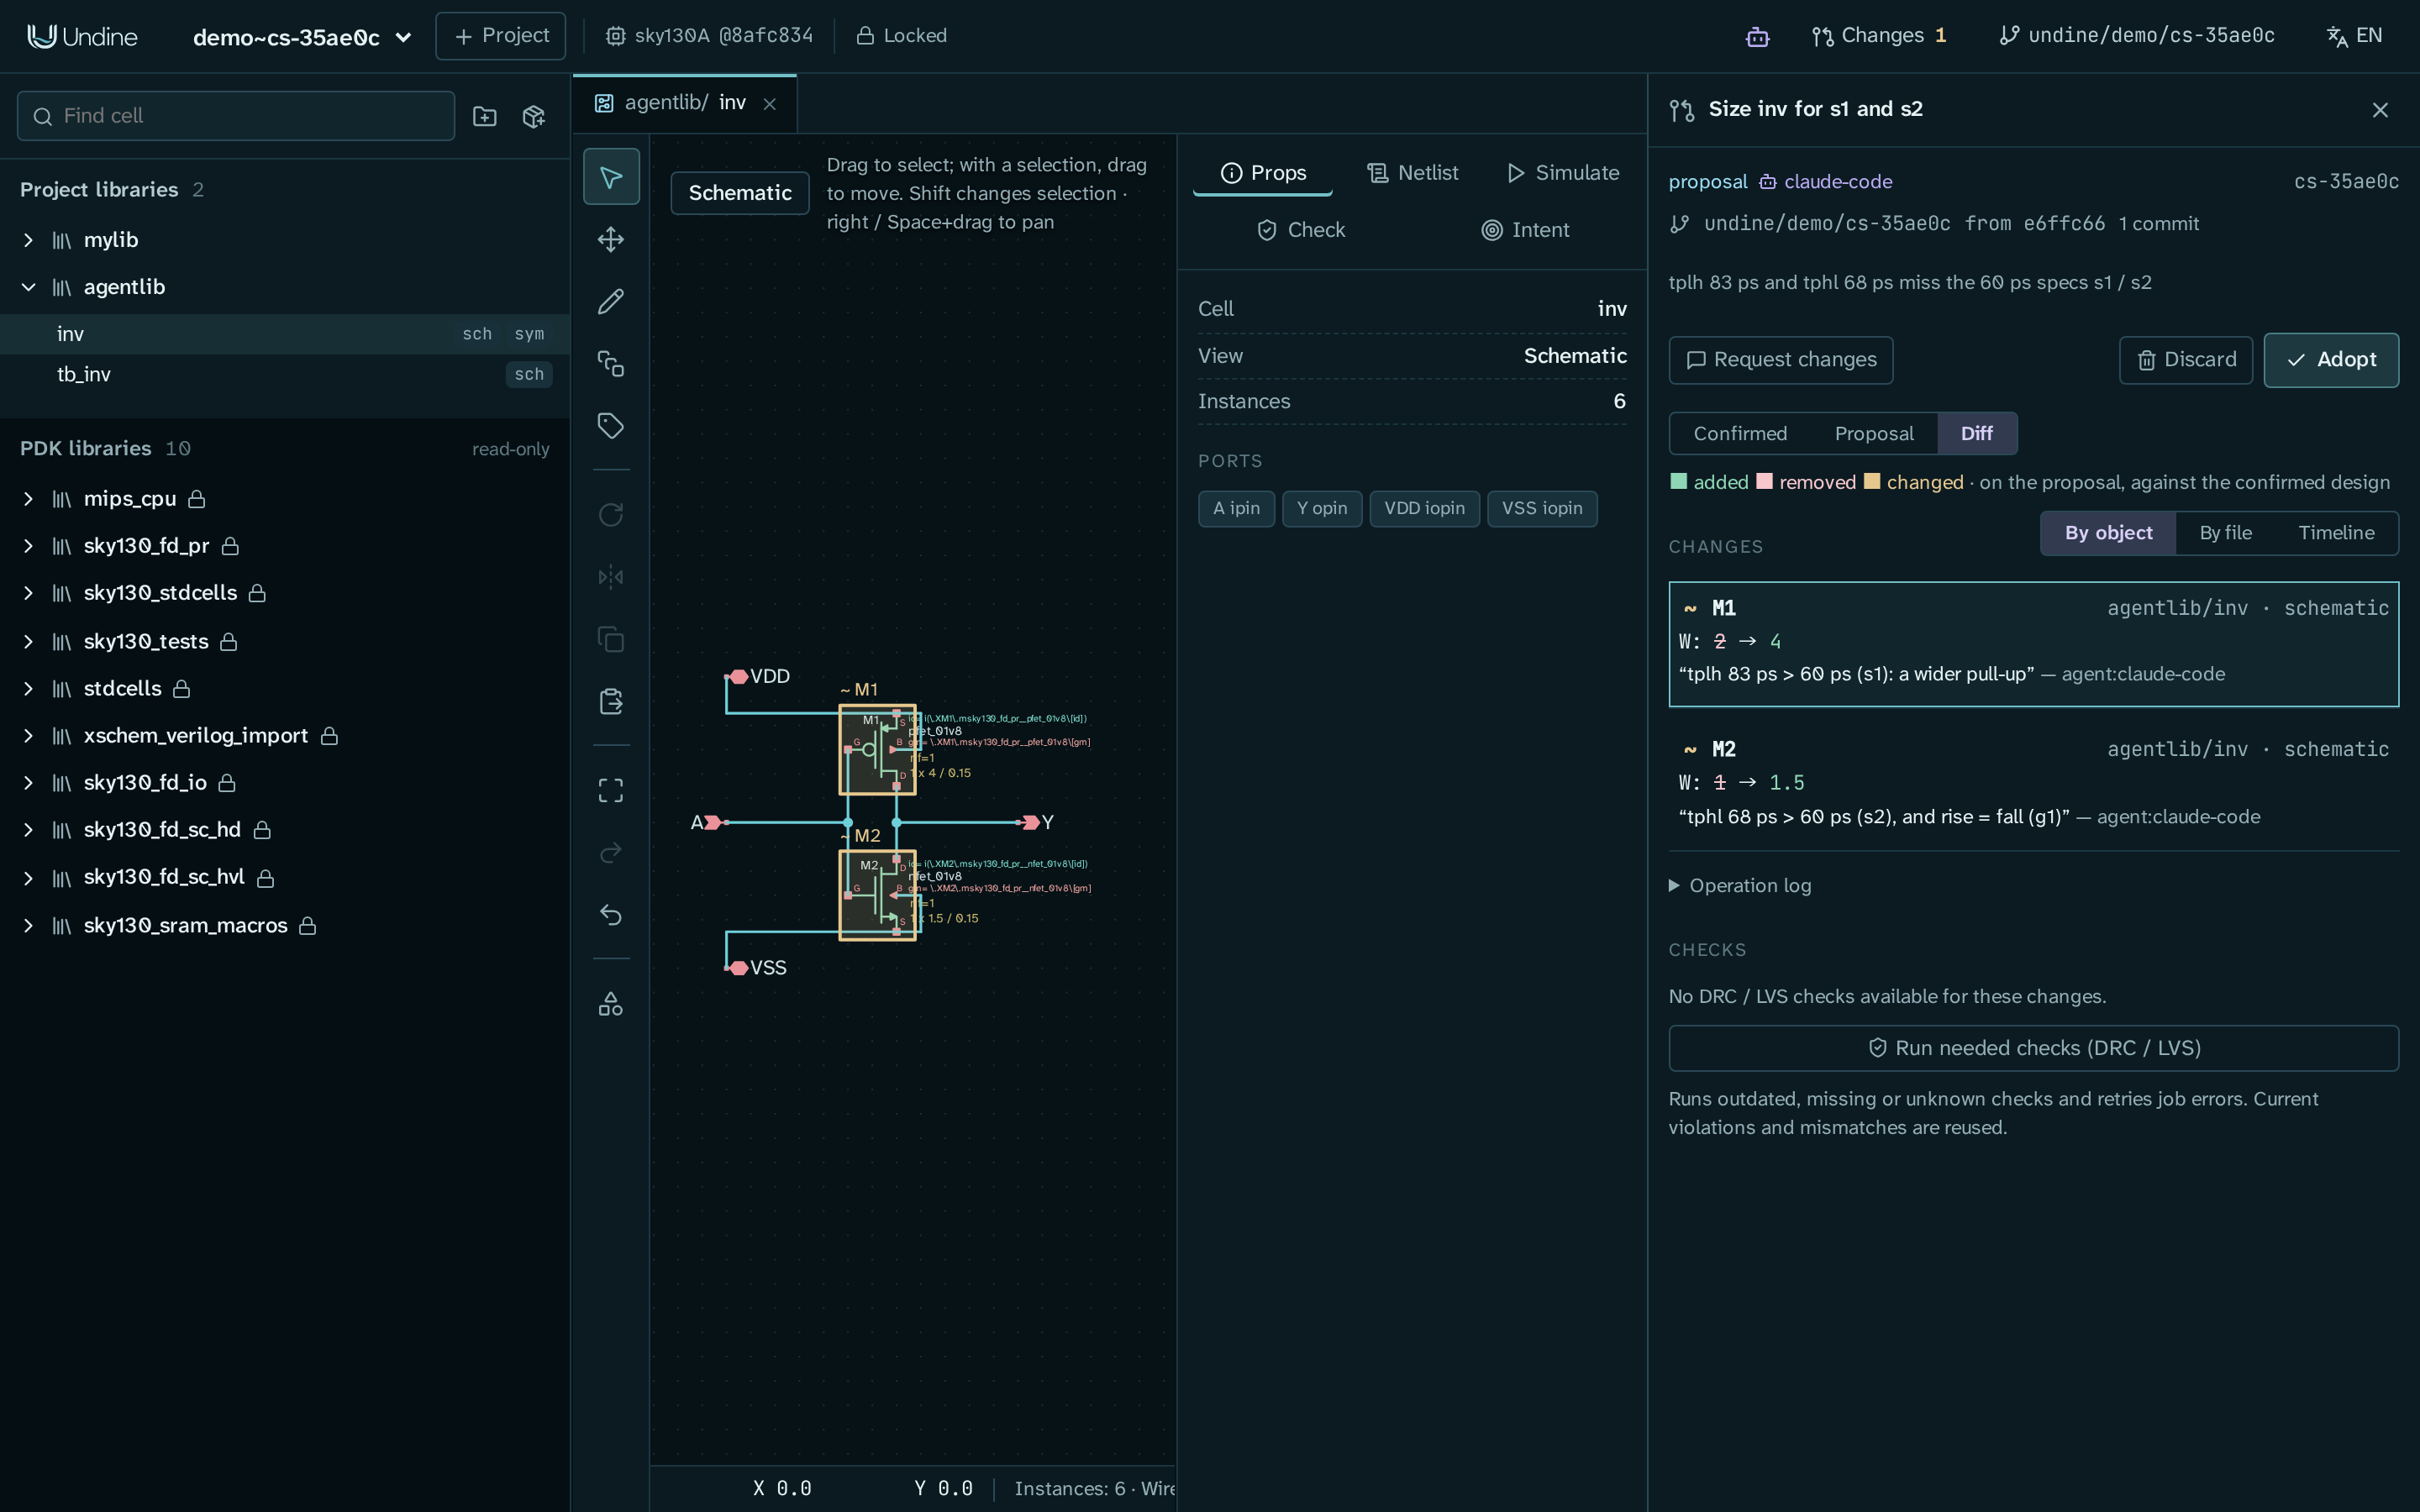
Check these parts:
- The header: the title Size inv for s1 and s2,
claude-codeas the one who opened it, its id and git branch (undine/demo/cs-…), and the reason. - Diff: the drawing marks what differs from your design (added green, removed red, changed amber). Here M1 and M2 are amber, and nothing else is marked.
- By object: the two edits,
M1 W: 2 → 4andM2 W: 1 → 1.5, each with the reason Claude gave ("tplh 83 ps > 60 ps (s1): a wider pull-up"). Click one to open its view and highlight it. - By file: the semantic diff of the branch, file by file: the schematic (
instance M1: W: 2 → 4) and the netlist view that follows it. This is exactly what adopting merges, including anything no operation recorded. - Checks: here No DRC / LVS checks available for these changes., because
invhas no layout. With a layout, each check shows its result before and after the change; see If the cell has a layout.
Changesets describes the rest of the review, including the Timeline and restoring a checkpoint.
8. Adopt it
You now decide. If the proposal were not what you want, you would not adopt it but send it back (When you want changes instead). This one meets the intent, so adopt it.
Adopting is refused while the agent is still writing, so wait until the is editing line is gone (closing the chat releases the changeset at once; otherwise the agent's lock lapses two minutes after its last write).
- Click Adopt. The dialog Adopt this proposal? explains that the branch is merged into your design object by object, all or nothing.
- Click Adopt in the dialog.
You should see Proposal adopted: merge commit …. The review now says Adopted … by … · merge commit … and shows Revert instead of Adopt. The drawing returns to your design, which now has M1 4 µm and M2 1.5 µm.
Git has a merge commit Apply cs-…: Size inv for s1 and s2 on your branch (git log in the project, or the
History panel). The runs made in the changeset, such as the agent's check_specs and yours from
step 6, are kept with it as evidence, listed under Checks; see
Evidence after apply or discard.
If the merge is left uncommitted
The merge is committed only when nothing else in the project is uncommitted or untracked. If you skipped the commit
at the end of step 2, the files of agentlib and the intent are such changes: you then see Proposal adopted. The
project had other uncommitted changes, so the merge is left uncommitted in your working tree, and you commit it
yourself with git (the History panel shows what is uncommitted). The revert in step 9 is
then left uncommitted too.
If something in your design changed the same objects since the proposal was opened, nothing is written and the review lists the conflicts; see Adopting: the merge. For other messages, see Changesets and adopting in Troubleshooting.
9. Revert it
An adopted changeset can be taken back at any time, also after other changes, as long as they did not touch the same objects.
- Open the changeset from Changes in the top bar (it is listed as adopted).
- Click Revert, then Revert in the dialog Revert the changeset?.
You should see Proposal reverted: commit …, and the review says Reverted … by …. The design has M1 2 µm and
M2 1 µm again, and git has a commit Revert cs-…: Size inv for s1 and s2 on top. The changeset, its evidence and both
commits stay in the history. Undo does not cross an adopt: Revert is the way back.
When you want changes instead
On your own cells, a proposal will not always be what you want. You then do not adopt it. You have three ways on:
-
Tell Claude what to change in the same chat. It continues the same changeset, and the review shows the new steps. For example:
I would rather keep M1 at 3 µm or less. Can you still meet s1 and s2? If not, do not change the specs: tell me which limit you would need and why.
Here the agent cannot meet
s1with M1 at 3 µm (about 65 ps). Since a spec is something only you relax, it should say so and propose an intent change (for examples1at 66 ps) rather than edit it silently. If it does change an intent item, that change is in the changeset like any other, listed under By object, for you to keep or reject.If you closed the chat in the meantime, start a new one and ask: "Continue the open changeset
cs-…indemo." Claude finds it withlist_changesetsand continues it withopen_changeset. -
Fix small things yourself: switch to Proposal and edit in the preview. Your edit is recorded in the changeset as yours, next to the agent's.
- Drop the whole proposal with Discard: its working copy is removed, and its branch, its changes and the check evidence are kept.
Request changes
Request changes in the review opens Undine's own in-app Agent with the message box ready. It needs a connection of its own (an API key or a local LLM, see below). With Claude over MCP, simply answer in the chat.
If the cell has a layout
A cell with a layout gives the agent a second half to do: the layout has to follow the new widths, and run_checks
has real work to do. Build a routed inverter in a library of its own, layoutlib, for this. mylib/inv from First
project would do as well, but the Tiny Tapeout tile tt_um_undine_inv places it at fixed offsets, and a resized,
re-routed mylib/inv would break the tile's connections.
cd ~/undine-eda
pixi run python examples/make_inverter.py demo layoutlib
pixi run python examples/route_inverter.py demo layoutlib    # layout of inv, routed, then LVS
route_inverter.py ends with done {"match": true, ...}. Reload the page, give layoutlib/inv the same intent
(step 2, on its cell page), commit as at the end of step 2, and send the request of step 4 with layoutlib/inv.
A changeset that changes only the schematic makes LVS fail. The review shows it under Checks: LVS layoutlib/inv with Base match → Proposal mismatch, marked regression, and a line under Adopt says how many checks got worse with this change. Ask the agent to finish the job:
The layout of
layoutlib/invin your changeset must follow the new widths. Runsync_layout, re-route what it leaves open, and runrun_checksuntil DRC (KLayout and Magic) and LVS are as clean as before your change. If something is left, tell me what and where.
sync_layout swaps each transistor's PCell in place for one of the new width. The larger devices no longer meet the
old wires and rails, so right after it LVS still fails and Magic's DRC finds violations; the agent then re-routes with
route (and get_layout_info, get_drc_report to see what is open) and checks again. Each round updates the rows
under Checks, each checker's Base and Proposal side by side, until none says regression. How many rounds that
takes depends on the agent; you decide when the result is good enough. See Verification
for the checks themselves.
The in-app Agent instead
If you have no Claude Code or Claude Desktop, or want everything to stay on your machine with a local LLM, use the Agent built into Undine. The intent, the changeset, the review and adopting are the same; only the chat moves into Undine.
- Click the Agent icon (the robot) just left of Changes in the top bar. The chat opens at the top of the left column.
- Click the settings icon (sliders) in its header, Add a connection, and Use this connection, as in Connect an AI agent, part B.
- Open
inv, and send the prompt of step 4 (the project is the one you have open, so you can leave it out).
The chat shows each tool call as it starts and ends, and Stop ends the turn before its next step. When the agent changes something, the review opens on its changeset and the drawing follows, as in step 5. In a review, Request changes opens this chat ready to continue the same proposal. Small local models often fail at multi-step work like a sweep; use the largest model that runs well. Details: Agent and MCP.
Example prompts
These work with Claude over MCP; the project is named in each because one Claude session can work on any project.
Replace demo, agentlib and the cell names with yours.
Record requirements as intent (they arrive in a changeset, quoted from your message):
In
demo, record in the intent ofagentlib/inv: "Rise and fall delay at most 60 ps into 20 fF, measured on tb_inv. Keep L at the minimum. Area matters more than speed beyond the spec." Add the delay specs with their own.measstatements, so thattb_invitself stays as it is.
Explore before you decide (no changeset, nothing changes):
In
demo, sweepM1.Wfrom 2 to 6 µm andM2.Wfrom 1 to 3 µm inagentlib/invagainst its specs and show me the five best points with their delays. Do not change anything yet.
Build a new cell from its intent:
In
demo, create a new cellota5tinagentlib: a 5-transistor OTA (NMOS input pair, PMOS current mirror load, NMOS tail current source) with ports inp, inn, vbias, out, vdd, vss, its symbol, and a testbenchtb_ota5twith a 1 pF load and an AC analysis. Record a spec "DC gain at least 30 dB" ontb_ota5tand size the OTA to meet it.
Have a second agent verify the first one's work:
In
demo, the changesetcs-…is someone else's. Without opening it, runcheck_specsonagentlib/invwithchangeset: cs-…at every corner, andrun_checkswith the samechangeset, and tell me whether it does what its title says.
Wait for your decision:
When you are done, tell me, then wait with
wait_foruntil I adopt or discard the changeset, and say what happened.
What you learned
- The design intent (goals, preferences, constraints, specs with a testbench) is how you tell an agent what a cell is for. It works from it, and changes to it come back to you as proposals.
- An agent over MCP works through Undine's typed tools (
check_specs,sweep,open_changeset,set_instance_params,run_checks...) and only ever writes into a changeset. - Undine follows the agent live, and Stop is always one click away.
- You review a changeset by object, by file and as a Diff, with the checks of the base and the proposal
side by side, and verify the specs yourself with
check_specs changeset=…. - Adopt makes a merge commit (when the rest of the project is committed) and keeps the evidence; Revert takes it back with a commit of its own.
Next steps
- Agent and MCP: every tool, several agents on one connection, the shell and Python clients, and the agent guide.
- Changesets: the review, restoring a checkpoint, check freshness, the merge and evidence.
- Cells, intent and views and the design intent design notes: view intent, constraints with rules, the YAML format.
- Verification: DRC, LVS, ERC, parasitic extraction and post-layout simulation.
- Git history: the commits an adopt and a revert make, and merging branches of your own.
- Troubleshooting: MCP connections, adopting, and the other messages you may meet.